Replacing a toilet flange might seem daunting at first, but with proper tools and patience, you can manage this plumbing repair service project independently. Knowing how to replace a flange saves time and money from toilet repair to complete toilet replacement. Mr. Rooter Plumbing dives into these steps so your toilet returns to working order!
Understanding Your Toilet Flange
Your bathroom's toilet flange is an integral component of its plumbing system, serving as the connection point between the toilet and drainpipe. A broken or worn-down flange could result in leakage and flooding, so it's imperative that any issues requiring repair be attended to quickly—whether by calling in professional help or doing DIY repair efforts yourself. Knowing when it is wiser to call professional plumbing services or do repairs on your own is also key for efficient functioning.
Signs You May Require a Toilet Flange Replacement
Before we proceed with the replacement of our current flanges, we must recognize any signs that indicate its necessity:
- Water on the floor around the base of the toilet
- Unstable toilet that rocks or moves
- Unpleasant odors indicating a broken seal
Step 1: Prepare the Area
Safety is of utmost importance. Begin by switching off the water supply line. Flush out the toilet's tank and bowl using a sponge or vacuum attachment before disconnecting the water line completely. It may also be prudent to lay down towels or newspapers to catch any spillage that might happen along the way.
Step 2: Remove the Toilet
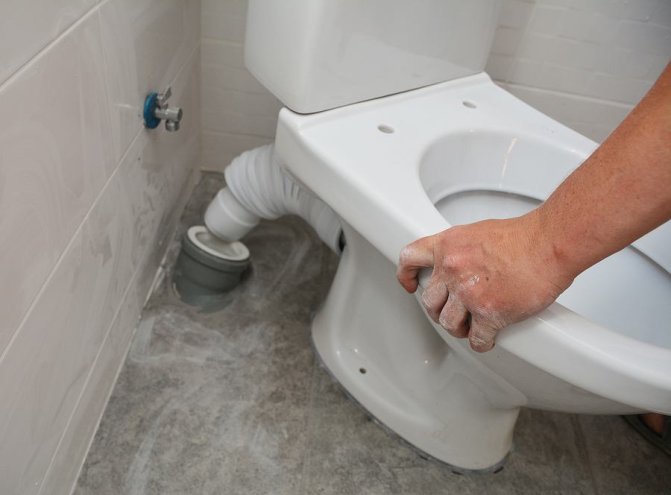
Taking your toilet out is a necessary step to gain access to your flange. Start by unscrewing its nuts at its base, then take steps such as taking out its caps at its base, and finally, with help from someone, lift it straight up onto a towel or piece of cardboard. This is a good time to assess whether hiring a professional plumbing repair service would be useful or if this can be completed on your own.
Step 3: Removing the Old Flange
Once the toilet has been unbolted, its old flange should become visible. Carefully unfasten any screws holding it to the floor. If attached directly to a drainpipe, special tools or techniques may be required to unfasten and unglue it without damaging it. If any difficulties arise when performing this step, it would be advisable to consult a professional plumbing service immediately for guidance and removal assistance.
Step 4: Prep Work Before Installing the New Flange
Brush the area around the drainpipe to prepare it for the installation of its new flange. Remove old wax and debris and ensure a smooth surface for optimal sealing. Proper preparation can prevent future leakage issues from developing.
Step 5: Install the New Flange
Once the drainpipe has been secured on the floor, set up your new flange over it, ensuring it sits flush and level with it. If necessary, use shims to level it. Screw into place using corrosion-resistant screws if applicable for optimal results.
Step 6: Installing the New Flange and Wax Ring
Once the new flange is in place, it's time to replace the wax ring that ensures watertight sealing between your toilet and its new flange. Carefully lower back into position your new wax ring before pressing down onto it for a good seal. Then, reconnect all nuts, caps, and water supply lines as before.
Step 7: Testing and Final Touches
Reconnect the water supply, refill your toilet tank, flush a few times to test for leaks, and pay special attention to where the base connects with plumbing systems. If all looks well, congratulations—you've successfully replaced your flange!
When to Contact a Professional Plumbing Repair Service
While this guide should assist in taking on toilet replacement and repair tasks, professional help from experienced plumbers may sometimes be required for certain scenarios. In such instances as broken pipes, serious leakage issues, or nonstandard flange dimensions requiring professional intervention, seek help from a professional repair service immediately to ensure a satisfactory solution and that your plumbing system runs efficiently. A skilled professional can bring peace of mind, guaranteeing optimal functioning for you and your plumbing system!
Mr. Rooter Plumbing
Replacing a toilet flange doesn't need to be daunting if you follow these steps carefully, making this essential plumbing repair possible independently. From minor toilet repairs to full toilet replacement, understanding how to replace a flange is a valuable skill that could save years from now. When in doubt, never hesitate to hire professional help from Mr. Rooter Plumbing for better results and ensure long-term plumbing health for the bathroom! Proper planning lets you keep bathroom plumbing looking its best over the years ahead.


